Right, so here's the thing. I know I'm lucky to have the space I have but with a houseful of students staying with us in the early part of this year I was worried about my projects taking a back seat when the spare room was in use. When we had students last year I found that my activities kind of slowed to a stop as all my gear lives in the spare room wardrobe.
I'm really keen to scale it up this year, not the other way around so I put my thinking cap on. Result - garage conversion!
Now, we have not been able to fit the car (or anything much else) in the garage for almost two years so nothing lost there. However, the reason we have not been able to fit the car in is the amount of "stuff" lurking in there. Solution - deal with the "stuff" and create a brand new "project space" and area for the printer/filing etc so that all that stuff is out of my therapy room - yay.
It's taken a bit of a reshuffle,otherwise known as "Leigh's Big Day In". It was a big day and I was shattered by the end but I'm super excited by the space I've created. I've split the garage in half across the middle so that all the utility stuff is at the front and therefore easily accesible when the door is up.
The non-projecty, non-sewing friends amongst you will look at this and maybe think, yeah so but to me, this means a whole new level of opportunity. A space where I can have my "works in progress" around and can leave them out when I'm not working on them. Somewhere where my machines, tools, fabrics can be set up and ready to go anytime without driving my family crazy, oh the bliss! Any sewer or crafter with limited spare time will know relate to how much energy is spent packing up and getting out your stuff to work on the project. Sometimes I'm getting too tired in the evenings before I'm even set up so a designated "Leigh space" is unbelievably decadent. I've actually been cruising out there just to look at it and imagine the possibilities, sad but true.
So, without further blabbing on, here are the pics of my new "room":
Imagine there is no "away" all that stuff that we all throw "away" is still here, cluttering up our already cluttered world. Recycle, upcycle, repurpose and reuse, it's what I do!
Wednesday, January 11, 2012
Wednesday, January 4, 2012
2012 challenge "Make do with nothing new"
As I've got more into my recycling projects I've also become more thoughful of just how much of a throw away society we have become. The only trouble with that is that there is no "away", all the stuff we chuck out is still here clogging up our space/planet and this bothers me. I've also realised that stuff = stress and that I have way too much of both right now.
Soooooo..... my challenge for 2012 is to "make do with nothing new" for the whole year in an effort to vastly reduce our family's footprint.
We are an ordinary family who have never attempted anything like this before so I do realise it's gonna be a huge challenge but I think I'm up to it and I'm really looking forward to seeing how it changes the way we live. So here goes:
In 2012 I challenge myself to:
This is going to be a huge learning curve for us and I would love you to share all your positive suggestions, tips, advice and support. Please remember that I'm a person, just like you, I'm not trying to tell anyone how to live, just trying something new for us.
I'm looking forward to blogging our progress, who knows were we'll end up? Right now I'm off to install the "No junk mail" sign on the letterbox.
Ciao for now
Soooooo..... my challenge for 2012 is to "make do with nothing new" for the whole year in an effort to vastly reduce our family's footprint.
We are an ordinary family who have never attempted anything like this before so I do realise it's gonna be a huge challenge but I think I'm up to it and I'm really looking forward to seeing how it changes the way we live. So here goes:
In 2012 I challenge myself to:
- Make no new purchases of non-essential items for 12 months.
- Source things we do need from recycled (preferably charitable) sources.
- Re-use and re-purpose things we already have in our household wherever possible.
- Consciously choose foods with minimal packaging and source all we can from local businesses.
- Recycle everything we can.
- Greatly increase the volume of food we grow ourselves organically.
- Continue to recycle and upcycle all sorts of things for my projects.
- Generally make do with what we already have and get creative with it.
- food;
- toiletries;
- kids shoes & school gear;
- replacement of necessary household appliances should they be unrepairable; and
- repair/servicing of cars and the caravan.
This is going to be a huge learning curve for us and I would love you to share all your positive suggestions, tips, advice and support. Please remember that I'm a person, just like you, I'm not trying to tell anyone how to live, just trying something new for us.
I'm looking forward to blogging our progress, who knows were we'll end up? Right now I'm off to install the "No junk mail" sign on the letterbox.
Ciao for now
Tuesday, December 20, 2011
Tip Shop armchair
Hi everyone and welcome to my latest project, the tip shop chair!
Now those of you who know me will know that the tip shop is one of my favourite places to visit. All that booty just chucked out, you never know what you might find. This particular specimen cost me the grand sum of $15 which I was delighted with I must say. Why anyone would just throw out a classic old chair like this is beyond me but hey, one man's trash is another girl's treasure.
The structure is just fine here and the chair is super comfy, just the upholstery to replace as it is a bit shabby. The good news though is that this chair has been reupholstered at least once before (I think from the shape the chair itself is quite a good age). This means that I can use the pieces to make templates and see how the upholsterer went about the job much easier than if the upholstery were original.
The plan is not yet clear but I'm still on my recycled denim wagon so I think some kind of patchwork design might be the go. This is by far the biggest fitted upholstery project I've tried so I'll keep you posted.
As Christmas is nearly here so I'll have until the New Year before work starts to come up with flashes of inspiration.
How hard can it be .....
Friday, December 16, 2011
Patchwork chair reno
Just a little update and a new pic of my patchwork chair project. I've been very busy with my projects recently and have just finished (finally) adding the trim to this chair. Its 3 little "friends" have also been all stripped back ready for a makeover. I also decided to distress the chairs a little and it suits the whole look although it is hard to really see that in the photo. This one is staying here with me however the other 3 will be up for sale once completed and I'll post them here first. I also take orders or refurbish your existing chairs in your own colour scheme using as much recycled material as possible for each project. Here she is!
This post covers a whole new project I've had happening for a while so I thought I'd share.
I was given four of these chairs which were painted in a cream(ish) colour with purple velour seats and gold piping.
They had been in storage for some time and they have hung around as a possible project for years waiting for me to decide where to go with them so the fabric and the paintwork was pretty shabby looking and not really my taste. This post is the story of the first chair.
With my current dual obsessions with recycling denim and all things patchwork, this is what I came up with.
Sanded back and repaint the chair white.
Pulled off all the upholstery and used the old bits as a template to create patchwork pieces to go back on. (All the fabric used was already in my stash as was the paint so no cost involved.)
Using a staple gun, fitted the new upholstery onto the freshly painted chair and ... voila
I still have to glue the trim in place over the staples to satisfy my picky nature but all up I'm delighted with the results. The big decision now is whether to keep this as a feature chair and do the others completely differently or create a "set" of four (although they will all be different of course). What do you think?
Tuesday, December 6, 2011
Humpty Dumpty sat on a wall ...
What to do on a wet windy day with the kids on holidays? Get the sewing machine out and have a go at making them some toys, what else. Here's humpty, and I'm pretty happy with the way he's turned out. He's completely made from bits and pieces already lurking in my fabric stash so he cost nothing to make. The original plan was that he would be a gift for Christmas however he has been adopted by my 5 year old son (who reckons he's "awesome") so I'll have to come up with something else for the gifts. I also now have an order from Miss 3 for a pink and purple unicorn with ribbons and shiny bits ... hmmmmmmm.
Saturday, December 3, 2011
Byron Bay Roadtrip
Ok Ok, I know I have been totally slack with progress reports on the van so apologies for that. The time has just zipped by recently and I've been meaning to take some update photos. This weekend we went to the lovely Suffolk Park Holiday Park at Byron Bay for a weekend in the van so I took a couple of shots as we were packing up. I'm pretty happy with it all now and have decided not to bother with changing the cupboards for the time being. I think I'll keep that for an inspired moment somewhere down the track.
The van went into the repair shop last week for a set of sexy new legs as we managed to snap one of the corroded old ones off on our last outing. The new ones are longer and stronger which makes the van much less rocky than it was. It cost us a little bit to have done and I wish I could do that sort of job myself however a complete lack of welding skills (or interest in welding come to think of it) meant that the lovely guy at the caravan repair shop got the job.
What has been finished by me is the curtains. We now have full blackout curtains in a plain colour to match the canvas so you don't really see them. These were made from bargain fabric I found at the Spotlight clearance. Full blockout curtain material down from $22 per metre to just $2, I was on a high for days about that find! I've jazzed up the plain with red spotty lighter weigh fabric curtains for the bed ends, tiebacks and on the door. The original plan was red spots all round but the effect was way to much, made me feel seasick.
Other than that, this weekend was our first (and possibly last) attempt at using the awning which came with the van. It works fine but takes nearly as long to put up as the whole tarp setup so we will just use that I think for long trips and take the pop up gazebo for short ones.
The van itself we are really getting the hang of and it's quicker to put up each time now, I'm really pleased with it overall and am starting to think an external paintjob may be on the cards.
Here are the latest photos:
Quite a change from this:
All up I'm feeling pretty proud of myself and inspired to tackle some new projects so watch this space.
Monday, October 3, 2011
Love my caravan
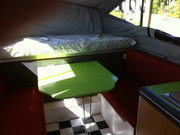
The whole project is coming along really well now, sorry it's been a while since the last post but there are loads of changes and I'm really loving the van now. The space has gone from bug infested and quite scary to be in to fresh and clean and ready to travel. Here is a rundown on what I've done and the order I did it in:
I'm still working out what I'm going to use on the cupboard doors, want to wait until the curtains are in to see what will work.
Here are the pics
- Painted the brown ceiling, cupboard frames and cabinetry white.
- Relined the old and perished ply facings below the beds and round the seating area in grey vinyl. I know that these shuld probably have been ripped out and replaced but hey, it's a fun van and that was WAY too labour intensive and difficult.
- Recovered the mattresses.
- Recovered the seating cushions - the old covers were basically more dust than fabric but I managed to salvage and reuse the zips after a wash.
- Relaid the floor to cover the old brown one. These are stick on tiles from Bunnings which can be cut to size with scissors. They discontinued them half way through the project and I had to do a spot of detective work to track some more down but I love them and this is a much easier option that trying to work with the rolls of vinyl on this kind of space.
I'm still working out what I'm going to use on the cupboard doors, want to wait until the curtains are in to see what will work.
Here are the pics
Subscribe to:
Posts (Atom)